6.3 KiB
Updates with the Web Browser
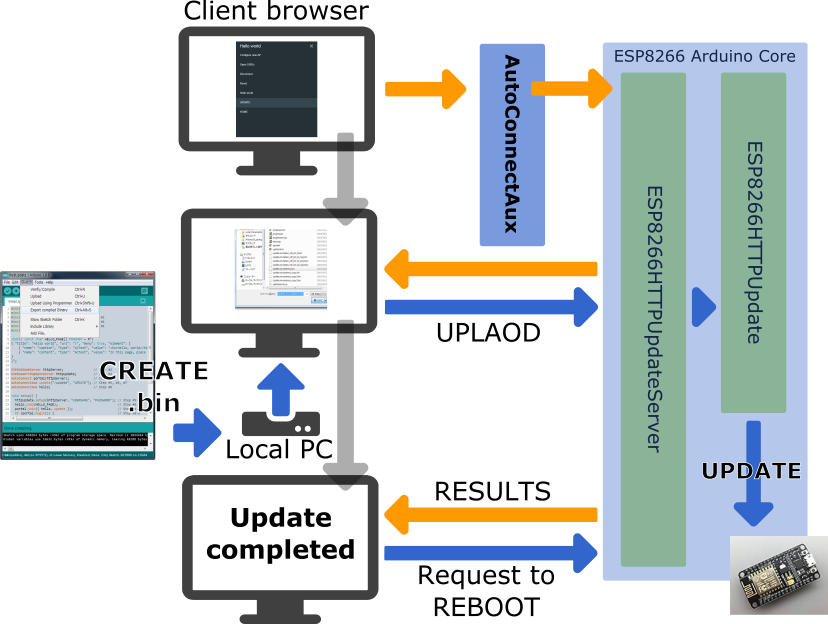
You can implement the user sketch as described in the ESP8266 Arduino Core documentation to realize using the web browser as an update client. By incorporating the ESP8266HTTPUpdateServer class into AutoConnect, you can operate the page for selecting the update owned by ESP8266HTTPUpdateServer from the AutoConnect menu. Updates with a web browser are implemented using ESP8266HTTPUpdateServer class together with ESP8266WebServer and ESP8266mDNS classes. However, ESP32 Arduino core does not provide a class implementaion equivalent to ESP8266HTTPUpdateServer. Therefore, it is necessary to implement HTTPUpdateServer class for ESP32 to realize the update with a Web browser using the ESP32. The AutoConnect library includes an implementation of the HTTPUpdateServer class for ESP32 to make it easy for you to experience. 1
!!! warning "Client device equipped with Android OS" Depending on the state of Android OS configuration, Bonjour service may not be incorporated. This method does not work with some Android devices as the client.
How to embed ESP8266HTTPUpdateServer with AutoConnect
To embed the ESP8266HTTPUpdateServer class with AutoConnect into your sketch, basically follow these steps:
- Include
ESP8266mDNS.handESP8266HTTPUpdateServer.handWiFiClient.hadditionally, except the usual include directives as ESP8266WebServer and AutoConnect. - Declare an ESP8266WebServer object. (In ESP32, as WebServer)
- Declare an ESP8266HTTPUpdateServer object.
- Declare an AutoConnect object with an ESP8266WebServer object.
- Declare an AutoConnectAux object for the update operation page.
- Assign
/updateto the URI of the update operation page. - Assign an arbitrary title as the AutoConnect menu for the update operation page.
- Declare additional AutoConnectAux pages for your application intention as needed.
- Perform the following procedure steps in the
setup()function:- Invokes
ESP8288HTTPUpdateServer::setupfunction, specifies the USERNAME and the PASSWORD as needed. - Load the AutoConnectAux pages declared in step #8 for your application. (Except the update operation page)
- Join these pages to AutoConnect along with the update operation page declared in step #5.
- Invokes
AutoConnect::beginfunction. - Call the
MDNS.beginandMDNS.addServerfunctions to start the multicast DNS service.
- Invokes
- Perform the following procedure steps in the
loop()function:- Call the
MDNS.updatefunction to parse requests for mDNS. (No needed as ESP32) - Invoke
AutoConnect::handleClientfunction.
- Call the
#include <ESP8266WiFi.h>
#include <ESP8266WebServer.h>
#include <ESP8266HTTPUpdateServer.h>    // Step #1
#include <ESP8266mDNS.h>                // Step #1
#include <WiFiClient.h>                 // Step #1
#include <AutoConnect.h>

static const char HELLO_PAGE[] PROGMEM = R"(
{ "title": "Hello world", "uri": "/", "menu": true, "element": [
    { "name": "caption", "type": "ACText", "value": "<h2>Hello, world</h2>",  "style": "text-align:center;color:#2f4f4f;padding:10px;" },
    { "name": "content", "type": "ACText", "value": "In this page, place the custom web page handled by the sketch application." } ]
}
)";

ESP8266WebServer httpServer;                // Step #2
ESP8266HTTPUpdateServer httpUpdate;         // Step #3
AutoConnect portal(httpServer);             // Step #4
AutoConnectAux update("/update", "UPDATE"); // Step #5, #6, #7
AutoConnectAux hello;                       // Step #8

void setup() {
  httpUpdate.setup(&httpServer, "USERNAME", "PASSWORD"); // Step #9.a
  hello.load(HELLO_PAGE);                                // Step #9.b
  portal.join({ hello, update });                        // Step #9.c
  if (portal.begin()) {                                  // Step #9.d
    if (MDNS.begin("esp-webupdate"))                     // Step #9.e
        MDNS.addService("http", "tcp", 80);              // Step #9.e
  }
}

void loop() {
  MDNS.update();            // Step #10.a
  portal.handleClient();    // Step #10.b
}
!!! hint "For ESP32" This procedure is equally applicable to ESP32. If the target module is ESP32, change the following items:
- Change the include directive appropriately for the ESP32 environment.
- Change ESP8266HTTPUpdaetServer to HTTPUpdateServer using an implementation provided from AutoConnect library example code.
- Remove `MDNS.update` line from the sketch code.
!!! example "Share an ESP8266WebServer" AutoConnect shares the ESP8266WebServer instance with the ESP8266HTTPUpdateServer class. You can give the same instance as ESP8266WebServer instance given to AutoConnect to ESP8266HTTPUpdateServer class. ```cpp ESP8266WebServer httpServer; ESP8266HTTPUpdateServer updateServer; AutoConnect portal(httpServer);
updateServer(&httpServer);
```
This sharing specification is the same for ESP32.
The execution result of the above sketch should be as follows. 2
!!! faq "How LED ticking during an update" You cannot get the ticker with LED during an update by using this way. It is since the current implementation of the ESP8266HTTPUpdateServer class provided Arduino core library does not supply an LED pin to the ESP8266HTTPUpdate class.
How to make the binary sketch
Binary sketch files for updating can be retrieved using the Arduino IDE. Open the Sketch menu and select the Export compiled Binary, then starts compilation.
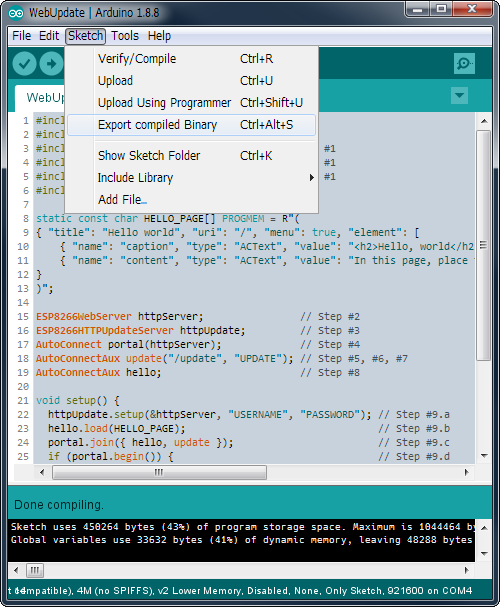
When the compilation is complete, a binary sketch will save with the extension .bin in the same folder as the sketch.