Using Update Server
Updates with the update server
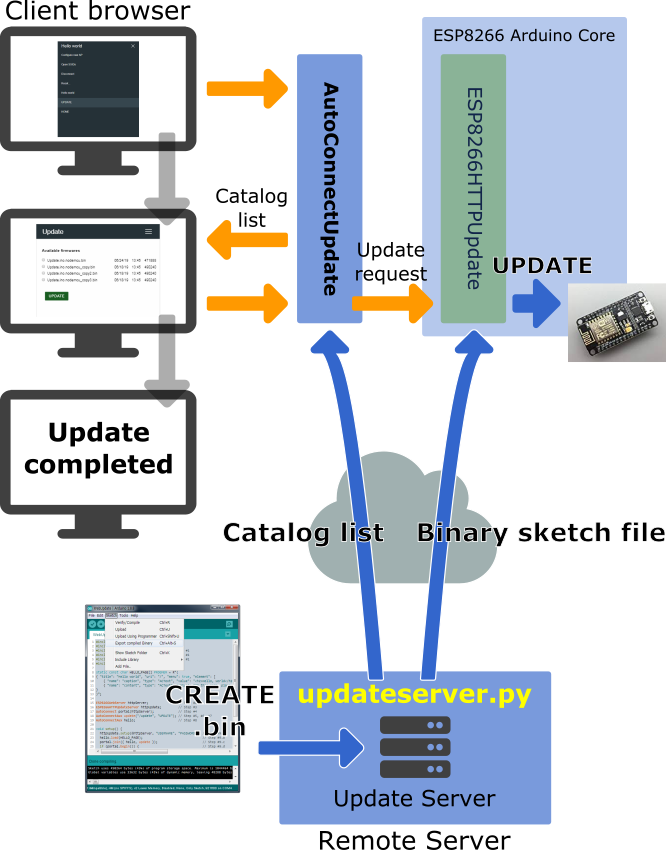
Since the v1.0.0 release, AutoConnect provides new feature for updating sketch firmware of ESP8266 or ESP32 modules via OTA using the AutoConnectUpdate class that is an implementation of the sketch binary update by the HTTP server mentioned in the OTA update of the ESP8266 Arduino Core documentation, which inherits from the ESP8266HTTPUpdate class (as HTTPUpdate class in the case of ESP32). It acts as a client agent for a series of update operations.
This method allows you to remotely update the ESP module's firmware across network segments from the update server, as long as you can ensure proper routing and forwarding.
If you choose this update method, you must prepare the server process that provides the binary sketch files for the update client agent as a variant of the HTTP server. This server requires to be able to handle the HTTP headers extended for updating the firmware generated by ESP8266HTTPUpdate class as described in the ESP8266 Arduino Core documentation, and the AutoConnectUpdate class generates those headers for it.
There are various implementations of update servers that provide binary sketch files. The ESP8266 Arduino Core documentation publishes a php script for the Advanced updater which is a process that works fully well with client agents using the ESP8266HTTPUpdate class, as suggested in the implementation. That is, the update server for AutoConnect must work with the client agent, and its implementation should make the handshake well with the AutoConnectUpdate class.
How to embed AutoConnectUpdate to your sketch
To embed the AutoConnectUpdate class into your sketch, basically follow these steps:
- Declare an ESP8266WebServer object. (In ESP32, as WebServer)
- Declare an AutoConnect object with an ESP8266WebServer object.
- Declare an AutoConnectUpdate object with the update server address and the HTTP port as parameters.
- Invokes AutoConnect::begin function.
- Attach the AutoConnectUpdate object to AutoConnect using AutoConnectUpdate::attach function.
- Invokes AutoConnect::handleClient function in the
loop().
#include <ESP8266WiFi.h>
#include <ESP8266WebServer.h>
#include <AutoConnect.h>

ESP8266WebServer server;                          // Step #1
AutoConnect portal;                               // Step #2
AutoConnectUpdate update("192.168.0.100", 8000);  // Step #3

void setup() {
  if (portal.begin()) {     // Step #4
    update.attach(portal);  // Step #5
  }
}

void loop() {
  portal.handleClient();    // Step #6
}
Behavior of the AutoConnectUpdate class
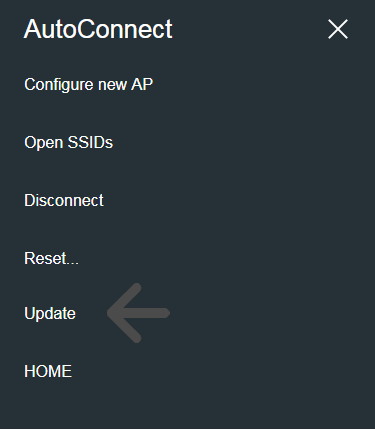
A sketch incorporating the AutoConnectUpdate class has an extended menu item as UPDATE in the AutoConnect menu. UPDATE as menu item will be attached by the AutoConnectUpdate automatically.
When an UPDATE item started, its first action is requesting a catalog list of updatable binary sketch files to the update server. Then the update server sends back the catalog list of stored binary sketch files to a client which is the ESP module. The AutoConnectUpdate class will display responded list to a custom Web page1 on the browser.

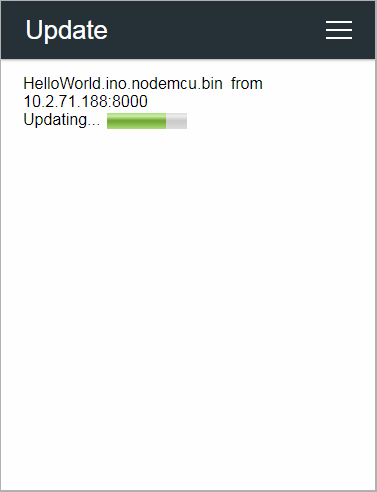
The substance of Available firmware list is a custom Web page by AutoConnectAux, and you can select the target binary sketch file with the radio button (AutoConnectRadio). A progress bar will appear to notify the updating status once the update has begun. When the update finished, the ESP module will reset automatically to launch a new firmware.

The AutoConnectUpdate class performs the above series of operations in conjunction with the update server. All you need to do is attach the AutoConnectUpdate class to AutoConnect and execute the AutoConnect::handleClient function in the loop().
Update server for the AutoConnectUpdate class
The above series of actions by the AutoConnectUpdate class requires a cooperated update server. You need to place the update server in a reachable location on the network. AutoConnect provides the update server scripts implemented in Python. This server script is implemented to fit with the AutoConnectUpdate class as a client agent for updating. Also, it exists for each corresponding version of Python 2 or 3.2
updateserver.py [-h] [--port PORT] [--bind IP_ADDRESS] [--catalog CATALOG] [--log LOG_LEVEL]
- --help | -hShow help message and exit.
- --port | -pSpecifies PORT number (Default: 8000)
- --bind | -bSpecifies the IP address to which the update server binds. Usually, it is the host address of the update server. When multiple NICs configured, specify one of the IP addresses. (Default: HOST IP or 127.0.0.0)
- --catalog | -dSpecifies the directory path on the update server that contains the binary sketch files. (Default: The current directory)
- --log | -lSpecifies the level of logging output. It accepts the Logging Levels specified in the Python logging module.
- --port | -pSpecifies PORT number (Default: 8000)
updateserver.py usage
-
Python
First, prepare a Python environment. It is also possible with a tiny single-board computer like the raspberry pi. Popular distributions such as Ubuntu for Linux include Python. You can easily set up a Python 2 or 3 environment. If you are using a Mac, you already have the Python 2 environment. macOS is equipped with Python 2.7 by default. In the case of Windows OS, it is necessary to install the Python environment intentionally. Please refer to the Python official page to install Python in your environment. -
Deploy the binary sketch files
Use the Arduino IDE to output a binary file of sketches and deploy it3 under the update server. The path which specifies for the --catalog option of updateServer.py is the path of the binary sketch files you deployed. -
Start updateserver.py
For example, to start the update server on the host with IP address 172.16.1.10 using 8080 port4, execute the following command:In this example assumes that the binary sketch files are deployed under the pathpython updateserver.py --port 8080 --bind 172.16.1.10 --catalog bin --log debug
binfrom the current directory.
Limitations of the updateserver.py
The updateserver.py script equips only the minimum facility because it assumes a private small OTA platform without identifying individual modules and version restrictions etc. To operate a larger OTA platform, it is necessary to identify the individual ESP module and to consider version control and security.
HTTP contents and the sequence for the AutoConnectUpdate class
The update server worked together the AutoConnectUpdate class can be prepared individually by yourself. If you want to improve the update server that can operate more broadly by equipping the extensions such as version control and authentications, it must implement the handshake requirements for AutoConnectUpdate class. The handshake with the AutoConnectUpdate class has two requirements:
- The update server notifies the catalog list of updatable binary files which stored in the update server to the client agent. 5
- Send an updating binary file and MD5 hash to a client in response to URI request (HTTP GET). 6
Above requirements will be implemented on along the HTTP protocol. The AutoConnectUpdate class requests an update server to notify the client for a catalog list of binary sketch files using an HTTP URL query string. The specifications of the HTTP query and the contents of the catalog list to be returned are as follows:
1. HTTP URL query for the catalog list of the updatable
[address]/_catalog?op=list&path=[path]
- addressURL of the update server
- /_catalogRequest path, it is fixed.
- opOperation command for the update server. Currently, only 'list' occurs.
- pathPath containing the updatable binary files on the update server.
- /_catalogRequest path, it is fixed.
2. The catalog list content
The response (that is, the catalog list) to the above query from the server is the following specification in JSON format.
{
  "name" : FILE_NAME,
  "type" : FILE_TYPE,
  "date" : FILE_TIMESTAMP_DATED,
  "time" : FILE_TIMESTAMP_TIMED,
  "size" : FILE_SIZE
}
- nameBinary sketch file name for update (String)
- typeOne of 'bin', 'directory' or 'file'. AutoConnect Update recognizes only file types of 'bin' as update targets. (String)
- dateFile update date. AutoConnect v1.0.0 treats the file update date as an annotation and is not equip the version control feature yet. (String)
- timeFile update time. AutoConnect v1.0.0 treats the file update date as an annotation and is not equip the version control feature yet. (String)
- sizeFile byte count (Numeric)
- typeOne of 'bin', 'directory' or 'file'. AutoConnect Update recognizes only file types of 'bin' as update targets. (String)
The above JSON object is one entry. The actual catalog list is an array of this entry since it assumes that an update server will provide multiple update binary files in production. The update server should respond with the MIME type specified as application/json for the catalog list.7
3. The binary sketch file used for updating
The AutoConnectUpdate class issues a HTTP GET request with the specified host address and URI. The update server responds by sending back a binary sketch file with the following header:
Content-Type: application/octet-stream
Content-Disposition: attachment; filename="BINARY_SKETCH_FILE_NAME"
Content-Length: LENGTH_OF_CONTENT
x-MD5: HEXDIGEST
The header x-MD5 is a 128-bit hash value (digest in hexadecimal) that represents the checksum of the binary sketch file for updates required for the ESP8266HTTPUpdate class.
-
You can scroll horizontally on the browser to see the timestamp and file size that the catalog list contains. ↩
-
The folders containing the script:
For Python2: AUTOCONNECT_LIBRARY_PATH/src/updateserver/python2
For Python3: AUTOCONNECT_LIBRARY_PATH/src/updateserver/python3 ↩ -
Deploying the binary sketch file output by Arduino IDE is usually just copying to the folder for deployment. However, its folder must be accessible from the updateserver.py script. ↩
-
The port of the update server and the port used by the AutoConnectUpdate class must be the same. ↩
-
The client agent is an instance of the AutoConnectUpdate class. ↩
-
The client agent will send its URI request to the update server. ↩
-
It should be represented as
Content-Type: application/jsonin the HTTP response header. ↩