58 KiB
Advanced usage
404 handler
AutoConnect cannot allow the Sketch registers the "Not-found" handler (404-handler) to the ESP8266WebServer natively. AutoConnect traps Not-found handler of the ESP8266WebServer for its own page processing. If the Sketch overrides the Not-found handler, AutoConnect will miss the opportunity to control the HTTP session and becomes unresponsive to the menu.
Registering the Not-found handler is a different method than for ESP8266WebServer, use AutoConnect::onNotFound. This restriction applies to the WebServer for ESP32 as well.
Access to saved credentials
AutoConnect stores the credentials of the established WiFi connection in the flash of the ESP8266/ESP32 module and equips the class to access them from the Sketch. The Sketch can read, write, or erase the credentials using this class as the AutoConnectCredential individually. Refer to section Saved credentials access for details.
!!! note "Where to store credentials in ESP32 with AutoConnect v1.0.0 or later"
Since v1.0.0, credentials are stored in nvs of ESP32. AutoConnect v1.0.0 or later accesses the credentials area using the Preferences class with the arduino esp-32 core. So in ESP32, the credentials are not in the EEPROM, it is in the namespace AC_CREDT of the nvs. See Saved credentials access for details.
In ESP8266, it is saved in EEPROM as is conventionally done.
Automatic reconnect
AutoConnect will change the WiFi mode depending on the situation. The AutoConnect::begin function starts WiFi mode in STA and starts the webserver if the connection is successful by the 1st-WiFi.begin. But if it will fail to connect with the least recently established access point, it will switch the WiFi mode to AP_STA and starts the DNS server to be able to launch a captive portal.
When the captive portal starts, SoftAP starts and STA disconnected. At this point, the station configuration information (it is known as the SDK's station_config structure) that the ESP module has stored on its own is discarded.
AutoConnect can connect to an access point again that has disconnected once, and its control is allowed by AutoConnectConfig::autoReconnect that option specifies to attempt to reconnect to the past established access point using the saved credentials. If the autoReconnect is enabled, AutoConnect will not launch SoftAP immediately even if 1st-WiFi.begin fails. When AutoConnect fails to connect WiFi, it will scan the WiFi signal to find out which access points it had connected to in the past. Then if it finds the saved BSSID in the broadcasts, AutoConnect will attempt to connect again applying the matched credential explicitly while still in STA mode. (AutoReconnect works well even with hidden SSID access points)
AutoConnect       Portal;
AutoConnectConfig Config;
Config.autoReconnect = true;
Portal.config(Config);
Portal.begin();
An autoRecconect option is only available for AutoConnect::begin without SSID and PASSWORD parameter.
!!! note "An autoReconnect is not autoreconnect" The WiFiSTAClass::disconnect function implemented in the arduino-esp32 has extended parameters than the ESP8266's arduino-core. The second parameter of WiFi.disconnect on the arduino-esp32 core that does not exist in the ESP8266WiFiSTAClass has the effect of deleting the currently connected WiFi configuration and its default value is "false". On the ESP32 platform, even if WiFi.disconnect is executed, WiFi.begin() without the parameters in the next turn will try to connect to that AP. That is, automatic reconnection is implemented in arduino-esp32 already. Although this behavior appears seemingly competent, it is rather a disadvantage in scenes where you want to change the access point each time. When explicitly disconnecting WiFi from the Disconnect menu, AutoConnect will erase the AP connection settings saved by the arduino-esp32 core. AutoConnect's automatic reconnection is a mechanism independent from the automatic reconnection of the arduino-esp32 core.
Autosave Credential
By default, AutoConnect saves the credentials of the established connection to the flash. You can disable it with the autoSave parameter specified by AutoConnectConfig.
See the Saved credentials access chapter for details on accessing stored credentials.
AutoConnect       Portal;
AutoConnectConfig Config;
Config.autoSave = AC_SAVECREDENTIAL_NEVER;
Portal.config(Config);
Portal.begin();
!!! note "Credentials storage location" The location where AutoConnect saves credentials depends on the module type and the AutoConnect library version, also arduino-esp32 core version.
| AutoConnect | Arduino core for ESP8266 |
Arduino core for ESP32 | |
|---|---|---|---|
| 1.0.2 earlier | 1.0.3 later | ||
| v0.9.12 earlier | EEPROM | EEPROM (partition) | Not supported |
| v1.0.0 later | Preferences (nvs) (Can be used EEPROM with turning off AUTOCONNECT_USE_PREFERENCES macro) |
Preferences (nvs) | |
Captive portal start detection
The captive portal will only be activated if 1st-WiFi::begin fails. Sketch can detect with the AutoConnect::onDetect function that the captive portal has started. For example, the Sketch can be written like as follows that turns on the LED at the start captive portal.
AutoConnect Portal;

bool startCP(IPAddress& ip) {
  digitalWrite(BUILTIN_LED, HIGH);
  Serial.println("C.P. started, IP:" + WiFi.localIP().toString());
  return true;
}

void setup() {
  Serial.begin(115200);
  pinMode(BUILTIN_LED, OUTPUT);
  digitalWrite(BUILTIN_LED, LOW);
  Portal.onDetect(startCP);
  if (Portal.begin()) {
    digitalWrite(BUILTIN_LED, LOW);
  }
}

void loop() {
  Portal.handleClient();
}
Captive portal starting control
Basically, the captive portal launch is subject to 1st-WiFi.begin result, but Sketch can control it. The Sketch can direct the following four actions by configuring AutoConnect with two parameters, AutoConnectConfig::immediateStart and AutoConnectConfig::autoRise.
| AutoConnectConfig ::immediateStart |
AutoConnectConfig::autoRise | |
|---|---|---|
| true | false | |
| true | Skip 1st-WiFi.begin ESP module becomes SoftAP and the captive portal starts immediately. |
Not attempt WiFi connection. Only WebServer will start in STA mode. |
| false | Attempts WiFi connection in STA mode. In some cases, the autoReconnect may restore the connection even if 1st-WiFiBeing fails. If the connection is completely lost, the captive portal will be launched. This is the default. |
Attempts WiFi connection in STA mode. In some cases, the autoReconnect may restore the connection even if 1st-WiFiBeing fails. ESP module stays in STA mode and WebServer will start. |
Captive portal timeout control
Once AutoConnect has entered the captive portal state due to the above conditions, it will not exit until a WiFi connection can be established. (But that is the default behavior)
The Sketch can abort the AutoConnect::begin by setting the captive portal timeout and returns control to Sketch. AutoConnect has two parameters for timeout control. One is a timeout value used when trying to connect to the specified AP. It behaves the same as general timeout control in connection attempt by WiFi.begin. This control is specified by the third parameter of AutoConnect::begin. The default value is macro defined by AUTOCONNECT_TIMEOUT in AutoConnectDefs.h header file.
The other timeout control is for the captive portal itself. It is useful when you want to continue sketch execution with offline even if the WiFi connection is not possible. You can also combine it with the immediateStart option to create sketches with high mobility.
The timeout of the captive portal is specified together with AutoConnectConfig::portalTimeout as follows.
#include <ESP8266WiFi.h>
#include <ESP8266WebServer.h>
#include <AutoConnect.h>

AutoConnect  portal;
AutoConnectConfig  config;

void setup() {
  config.portalTimeout = 60000;  // It will time out in 60 seconds
  portal.config(config);
  portal.begin();
}

void loop() {
  if (WiFi.status() == WL_CONNECTED) {
    // Some sketch code for the connected scene is here.
  }
  else {
    // Some sketch code for not connected scene is here.
  }
  portal.handleClient();
}
Also, if you want to stop AutoConnect completely when the captive portal is timed out, you need to call the AutoConnect::end function. It looks like the following code:
bool acEnable;

void setup() {
  config.portalTimeout = 60000;  // It will time out in 60 seconds
  portal.config(config);
  acEnable = portal.begin();
  if (!acEnable) {
    portal.end();
  }
}

void loop() {
  if (WiFi.status() == WL_CONNECTED) {
    // Some sketch code for the connected scene is here.
  }
  else {
    // Some sketch code for not connected scene is here.
  }
  if (acEnable) {
    portal.handleClient();
  }
}
There is another option related to timeout in AutoConnectConfig. It can make use of the captive portal function even after a timeout. The AutoConnectConfig::retainPortal option will not stop the SoftAP when the captive portal is timed out. If you enable the ratainPortal option, you can try to connect to the AP at any time while continuing to sketch execution with offline even after the captive portal timed-out. Compared to the above code specified no option with the following example code, the captive portal will remain available even after a timeout without changing the logic of the Sketch.
#include <ESP8266WiFi.h>
#include <ESP8266WebServer.h>
#include <AutoConnect.h>

AutoConnect  portal;
AutoConnectConfig  config;

void setup() {
  config.portalTimeout = 60000;  // It will time out in 60 seconds
  config.retainPortal = true;
  portal.config(config);
  portal.begin();
}

void loop() {
  if (WiFi.status() == WL_CONNECTED) {
    // Some sketch code for the connected scene is here.
  }
  else {
    // Some sketch code for not connected scene is here.
  }
  portal.handleClient();
}
Capture the legacy web pages as items into the menu
You can embed the ordinary page processed by the ESP8266WebServer request handler as an item into the AutoConnect menu. AutoConnect can capture the legacy web pages for ESP8266WebServer or WebServer of ESP32 and extends the menu containing these items.
In ordinary, the Sketch registers the request handler for the page depending on URI using the ESP8266WebServer::on function. AutoConnect allows Sketch to bundle the registered legacy page into a menu. the Sketch is able to include its URI to a menu item using AutoConnect::append function that creates internally an AutoConnectAux depended on its URI and integrates into the menu.
The following code has a mixture of both AutoConnectAux and the legacy web page. An AutoConnectAux page is menued automatically with the AutoConnect::join or AutoConnect::load function. Similarly, a legacy page is integrated by the AutoConnect::append function.
#include <ESP8266WiFi.h>
#include <ESP8266WebServer.h>
#include <AutoConnect.h>

ESP8266WebServer server;
AutoConnect      portal(server);

// Definitions of AutoConnectAux page
static const char PAGE[] PROGMEM = R"(
{
  "title": "PAGE",
  "uri": "/page",
  "menu": true,
  "element": [
    {
      "name": "cap",
      "type": "ACText",
      "value": "This is a custom web page."
    }
  ]
}
)";

void setup() {
  // The Web page handler located to /hello
  server.on("/hello", [](){
    server.send(200, "text/html", String(F(
"<html>"
"<head><meta name='viewport' content='width=device-width,initial-scale=1.0'></head>"
"<body><h2>Hello, world</h2></body>"
"</html>"
    )));
  });

  portal.append("/hello", "HELLO");  // Adds an item as HELLO into the menu
  portal.load(FPSTR(PAGE));               // Load AutoConnectAux custom web page
  portal.begin();
}

void loop() {
  portal.handleClient();
}
The AutoConnect::append function also has the third parameter that directly specifies the request handler. It has similar efficacy to calling the append and ESP8266WebSever::on at once. 1
portal.append("/hello", "HELLO", [](){
  server.send(200, "text/html", String(F(
"<html>"
"<head><meta name='viewport' content='width=device-width,initial-scale=1.0'></head>"
"<body><h2>Hello, world</h2></body>"
"</html>"
  )));
});
For more details, see section Attach the menus of Examples page.
!!! note "An instance of ESP8266WebServer/WebServer is needed"
When calling the append function with request handler parameters, an instance of the WebServer as the registration destination must exist.
AutoConnect can instantiate and host a WebServer internally, but in that case, the point in time to call the AutoConnct::append function with a request handler parameter must be after AutoConnect::begin.
Change the menu labels
You can change the label text for each menu item but cannot change them at run time. There are two ways to change the label text, both of which require coding the label literal.
-
Overwrite the label literal of library source code directly.
You can change the label of the AutoConnect menu item by rewriting the default label literal in AutoConnectLabels.h macros. However, changing menu items literal influences all the Sketch's build scenes.
#define AUTOCONNECT_MENULABEL_CONFIGNEW   "Configure new AP"
#define AUTOCONNECT_MENULABEL_OPENSSIDS   "Open SSIDs"
#define AUTOCONNECT_MENULABEL_DISCONNECT  "Disconnect"
#define AUTOCONNECT_MENULABEL_RESET       "Reset..."
#define AUTOCONNECT_MENULABEL_UPDATE      "Update"
#define AUTOCONNECT_MENULABEL_HOME        "HOME"
#define AUTOCONNECT_MENULABEL_DEVINFO     "Device info"
#define AUTOCONNECT_BUTTONLABEL_RESET     "RESET"
#define AUTOCONNECT_BUTTONLABEL_UPDATE    "UPDATE"
!!! note "build_flags with PlatformIO will no effect" The mistake that many people make is to use PlatformIO's build_flags to try to redefine any literal at compile time.
The AutoConnect library statically contains the label literals which are embedded as binary data when compiling the library code. The label literals will not change without compiling the library source.
And PlatformIO is a build system. Library sources will not be compiled unless AutoConnectLabels.h is updated. -
Change the label literals for each Arduino project
Another way to change the label literal is to provide a header file that defines the label literals, as mentioned in Appendix. You can also use this method to display label text and fixed text in the local language on the AutoConnect page. See Change the item's label text section for details.
Combination with mDNS
With mDNS library, you can access to ESP8266 by name instead of IP address after connection. The Sketch can start the MDNS responder after AutoConnect::begin.
#include <ESP8266WiFi.h>
#include <ESP8266mDNS.h>
#include <ESP8266WebServer.h>
AutoConnect Portal;

void setup() {
  if (Portal.begin()) {
    if (MDNS.begin("esp8266")) {
      MDNS.addService("http", "tcp", 80);
    }
  }
}

void loop() {
  Portal.handleClient();
}
Connects depending on the WiFi signal strength
When the ESP module found the multiple available access points (ie. AutoConnect has connected in the past), the default behavior AutoConnect will attempt to connect to the least recent one. However, If the ESP module can operate properly with any access point, it is advantageous to establish a connection with the best one of the reception sensitivity.
The AutoConnectConfig::principle parameter has the connection disposition, and specifying AC_PRINCIPLE_RSSI will attempt to connect to one of the highest RSSI value among multiple available access points. Also You can expect stable WiFi connection by specifying the lower limit of signal strength using AutoConnectConfig::minRSSI.
Combining these two parameters allows you to filter the destination AP when multiple available access points are found.
AutoConnectConfig::principle affects the behavior of both 1st-WiFi.begin and autoReconnect. If you specify AC_PRINCIPLE_RECENT for the principle, it will try according to the conventional connection rules, but if you specify AC_PRINCIPLE_RSSI, it will try to connect to the access point that is sending the strongest WiFi signal at that time instead of the last accessed AP. Also, the static IPs will be restored from a saved credential instead of AutoConnectConfig. (The values specified by AutoConnectConfig is ignored)
| SSID & Password |
AutoConnectConfig ::principle |
Which credentials would be selected | Static IPs | |
|---|---|---|---|---|
| AutoConnect ::begin |
NULL specified | AC_PRINCIPLE_RECENT | Nothing, depends on SDK saves | Use the specified value of AutoConnectConfig |
| AC_PRINCIPLE_RSSI | Auto-selected credentials with max RSSI | Restoring static IPs suitable for the SSID from saved credentials | ||
| Specified with the Sketch | Not effective | By AutoConnect::begin parameters | Use the specified value of AutoConnectConfig | |
| AutoReconnect | Load from saved credential |
AC_PRINCIPLE_RECENT | Recently saved SSID would be chosen | Restoring static IPs suitable for the SSID from saved credentials |
| AC_PRINCIPLE_RSSI | Auto-selected credentials with max RSSI |
Debug print
You can output AutoConnect monitor messages to the Serial. A monitor message activation switch is in an include header file AutoConnectDefs.h of library source. Define AC_DEBUG macro to output the monitor messages.2
#define AC_DEBUG
Detect WiFi connection establishment with a router
AutoConnect::onConnect allows the Sketch to detect a WiFi connection to a router. The Sketch uses AutoConnect::onConnect to register a function to call when WiFi connected.
For example, as the following Sketch, this can be combined with AutoConnectConfig::retainPortal to stop SoftAP in a loop(). It avoids blocking in the captive portal state by AutoConnect and allows the loop to run even without a WiFi connection.
#include <ESP8266WiFi.h>
#include <ESP8266WebServer.h>
#include <AutoConnect.h>

AutoConnect Portal;
AutoConnectConfig config;

void setup() {
  Serial.begin(115200);
  config.portalTimeout = 1;
  config.retainPortal = true;
  portal.config(config);
  portal.onConnect([](IPAddress& ip){
    Serial.printf("Connected %s\n", ip.toString().c_str());
    if (WiFi.getMode() == WI_AP_STA) {
      WiFi.softAPdisconnect(false);
      WiFi.mode(WiFi_STA);
    }
  });
  portal.begin();
}

void loop() {
  // Here, the Sketch can execute without WiFi connection.
  // It avoids blocking the state by the captive portal even if the captive portal is available.
  portal.handleClient();
}
!!! note "It is not an event"
AutoConnect::onConnect has the same effect on the Sketch as the WiFi.onStationModeConnected, but AutoConnect does not use the event. Sketch can use WiFi.onEvent independently of AutoConnect.
Disable the captive portal
It can also prevent the captive portal from starting even if the connection at the 1st-WiFi.begin fails. In this case, AutoConnect::begin behaves same as WiFi.begin.
For disabling the captive portal, autoRise sets to false with AutoConnectConfig.
AutoConnect       portal;
AutoConnectConfig acConfig;

acConfig.autoRise = false;
portal.config(acConfig);
portal.begin();
Make SSID of SoftAP unique
You can change SoftAP's SSID and password programmatically when the captive portal starts up. By using chip specific ID of esp8266/esp32 you can make SSID of SoftAP unique. SSID and password for SoftAP is AutoConnectConfig::apid and AutoConnectConfig::psk.
AutoConnect       portal;
AutoConnectConfig acConfig;

acConfig.apid = "ESP-" + String(ESP.getChipId(), HEX);
acConfig.psk = YOUR_PASSWORD;
portal.config(acConfig);
portal.begin();
!!! hint "Obtaining chip ID for ESP32"
acConfig.apid = "ESP-" + String((uint32_t)(ESP.getEfuseMac() >> 32), HEX);
On-demand start the captive portal
The default behavior of AutoConnect::begin gives priority to connect to the least recently established access point. In general, We expect this behavior in most situations, but will intentionally launch the captive portal on some occasion.
Here section describes how to launch on demand the captive portal, and suggests two templates that you can use to implement it.
-
Offline for usual operation, connect to WiFi with an external switch
You can use this template if the ESP module does not connect to WiFi at an ordinal situation and need to establish by a manual trigger. In this case, it is desirable that AutoConnect not start until an external switch fires. This behavior is similar to the WiFiManager's startConfigPortal function.
AutoConnectConfig::immediateStart is an option to launch the portal by the SoftAP immediately without attempting 1st-WiFi.begin. Also, by setting the AutoConnectConfig::autoRise option to false, it is possible to suppress unintended automatic pop-ups of the portal screen when connecting to an ESP module SSID.
To implement this, execute AutoConnect::config within the setup() function as usual, and handle AutoConnect::begin inside the loop() function.#define TRIGGER_PIN 5 // Trigger switch should be LOW active. #define HOLD_TIMER 3000 AutoConnect Portal; AutoConnectConfig Config; void setup() { pinMode(5, INPUT_PULLUP); Config.immediateStart = true; // Config.autoRise = false; // If you don't need to automatically pop-up the portal when connected to the ESP module's SSID. Portal.config(Config); } void loop() { if (digitalRead(TRIGGER_PIN) == LOW) { unsigned long tm = millis(); while (digitalRead(TRIGGER_PIN) == LOW) { yield(); } // Hold the switch while HOLD_TIMER time to start connect. if (millis() - tm > HOLD_TIMER) Portal.begin(); } if (WiFi.status() == WL_CONNECTED) { // Here, what to do if the module has connected to a WiFi access point } // Main process of your sketch Portal.handleClient(); // If WiFi is not connected, handleClient will do nothing. }!!! note "It will not be automatic reconnect" The above example does not connect to WiFi until TRIGGER_PIN goes LOW. When TRIGGER_PIN goes LOW, the captive portal starts and you can connect to WiFi. Even if you reset the module, it will not automatically reconnect.
-
Register new access points on demand
The following template is useful for controlling the registration of unknown access points. In this case, the ESP module establishes a WiFi connection using WiFi.begin natively without relying on AutoConnect.
Known access point credentials are saved by AutoConnect, to the ESP module can use the saved credentials to handle WiFi.begin natively. This means that you can explicitly register available access points when needed, and the ESP module will not use unknown access points under normal situations.AutoConnect* portal = nullptr; bool detectSwitch() { /* Returns true if an external switch to configure is active. */ } bool connectWiFi(const char* ssid, const char* password, unsigned long timeout) { WiFi.mode(WiFi_STA); delay(100); WiFi.begin(ssid, password); unsigned long tm = millis(); while (WiFi.status() != WL_CONNECTED) { if (millis() - tm > timeout) return false; } return true; } void setup() { AutoConnectCredential credt; station_config_t config; for (int8_t e = 0; e < credt.entries(); e++) { credt.load(e, &config); if (connectWiFi(config.ssid, config.password, 30000)) break; } if (WiFi.status() != WL_CONNECTED) { // Here, do something when WiFi cannot reach. } } void loop() { if (detectSwitch()) { AutoConnectConfig config; config.immediateStart= true; if (!portal) { portal = new AutoConnect; } portal->config(config); if (portal->begin()) { portal->end(); delete portal; portal = nullptr; } } // Here, ordinary sketch logic. }
Refers the hosted ESP8266WebServer/WebServer
Constructing an AutoConnect object variable without parameters then creates and starts an ESP8266WebServer/WebServer inside the AutoConnect. This object variable could be referred by AutoConnect::host function to access ESP8266WebServer/WebServer instance as like below.
AutoConnect Portal;

Portal.begin();
ESP8266WebServer& server = Portal.host();
server.send(200, "text/plain", "Hello, world");
!!! info "When host() is valid" The host() can be referred at after AutoConnect::begin.
Usage for automatically instantiated ESP8266WebServer/WebServer
The Sketch can handle URL requests using ESP8266WebServer or WebServer that AutoConnect started internally. ESP8266WebServer/WebServer instantiated dynamically by AutoConnect can be referred to by AutoConnect::host function. The Sketch can use the 'on' function, 'send' function, 'client' function and others by ESP8266WebServer/WebServer reference of its return value.
#include <ESP8266WiFi.h>
#include <ESP8266WebServer.h>
#include <AutoConnect.h>

AutoConnect       Portal;

void handleRoot() {
  ESP8266WebServer& IntServer = Portal.host();
  IntServer.send(200, "text/html", "Hello, world");
}

void handleNotFound() {
  ESP8266WebServer& IntServer = Portal.host();
  IntServer.send(404, "text/html", "Unknown.");
}

void setup() {
  bool r = Portal.begin();
  if (r) {
    ESP8266WebServer& IntServer = Portal.host();
    IntServer.on("/", handleRoot);
    Portal.onNotFound(handleNotFound);    // For only onNotFound.
  }
}

void loop() {
  Portal.host().handleClient();
  Portal.handleRequest();
  /* or following one line code is equ.
  Portal.handleClient();
  */
}
!!! note "ESP8266WebServer/WebServer function should be called after AutoConnect::begin" The Sketch cannot refer to an instance of ESP8266WebServer/WebServer until AutoConnect::begin completes successfully.
!!! warning "Do not use with ESP8266WebServer::begin or WebServer::begin" ESP8266WebServer/WebServer is already running inside the AutoConnect.
Use with the PageBuilder library
In ordinary, the URL handler will respond to the request from the client by sending some HTML. It will dynamically generate the HTML to respond to based on the sensing data etc. for the changing scene, but it contains elements of variable values in the middle of the HTML fixed string. Therefore, sketches tend to be in a tangled that repeats the logic for data handling and string splicing in turn, which tends to be less readable and maintainable.
PageBuilder library is an HTML assembly aid. it can handle predefined HTML like the template and simplify an HTML string assemble logic, and also the generated HTML send automatically.
An example sketch used with the PageBuilder as follows and it explains how it aids for the HTML generating. Details for Github repository.

Configuration functions
You can adjust the AutoConnect behave at run-time using AutoConnectConfig. AutoConnectConfig is a class that has only AutoConnect configuration settings. You define the behavior of AutoConnect using AutoConnectConfig member variables and give it to AutoConnect via the AutoConnect::config function.
AutoConnectConfig allows the Sketch controls the behavior of follows:
- Applying HTTP authentication
- Applying HTTP authentication for Built-in OTA
- Authentication with the captive portal state
- Assign user sketch's home path
- Built-in OTA update
- Change menu title
- Change SSID and Password for SoftAP
- Configuration for SoftAP and captive portal
- Configure WiFi channel
- Move the saving area of EEPROM for the credentials
- Preserve WIFI_AP mode
- Relocate the AutoConnect home path
- Static IP assignment
- Station host name
- Ticker for WiFi status
!!! note "AutoConnect::config before AutoConnect::begin" AutoConnect::config must be executed before AutoConnect::begin.
Applying HTTP authentication
The Sketch may use authentication to protect custom Web pages and prevent unauthorized access. AutoConnect has implemented HTTP authentication based on the ESP8266WebServer::authenticate function that allows applied to several scopes.
AutoConnectConfig::auth setting allows the Sketch to HTTP authenticate with "BASIC" or "DIGEST" scheme. AutoConnectConfig::authScope specifies the scope covered by authentication which is the whole range for all pages of the Sketch, custom web pages, or AutoConnect pages. AutoConnectConfig::username and AutoConnectConfig::password specifies credential as user-id/password pairs.
The Sketch enables HTTP authentication with the AutoConnectConfig::auth setting, also specifies the authentication scheme:
- AC_AUTH_NONE
AutoConnect pages and custom Web pages do not require authentication. Not protected from all HTTP access. This is the default. - AC_AUTH_DIGEST
Protect AutoConnect pages and custom Web pages with DIGEST authentication. - AC_AUTH_BASIC
Protect AutoConnect pages and custom Web pages with BASIC authentication.
Note that the authentication scope specified in AutoConnectConfig::authScope is different from the protection space shown by Realm for HTTP authentication. AutoConnect assumes only one Realm and defines it as AUTOCONNECT_AUTH_REALM in AutoConnectDefs.h header file. Instead, the Sketch will be able to expand or narrow the range of authentication by AutoConnectConfig::authScope setting, which can be either as follows:
- AC_AUTHSCOPE_PORTAL
Require authentication to access for all AutoConnect pages, including custom Web pages. - AC_AUTHSCOPE_AUX
Require authentication to access for all custom Web pages, excepting AutoConnect pages. This is the Default. - AC_AUTHSCOPE_PARTIAL
Authenticate only specific custom Web pages which are specified by AutoConnectAux::authentication function or JSON.
Also, a credential used for authentication is specified in the Sketch using the AutoConnectConfig::username and AutoConnectConfig::password settings.3
Here's a minimal Sketch with HTTP authentication for the custom Web page:
#include <ESP8266WiFi.h>
#include <ESP8266WebServer.h>
#include <AutoConnect.h>

static const char PAGE_AUTH[] PROGMEM = R"(
{
  "uri": "/auth",
  "title": "Auth",
  "menu": true,
  "element": [
    {
      "name": "text",
      "type": "ACText",
      "value": "AutoConnect has authorized",
      "style": "font-family:Arial;font-size:18px;font-weight:400;color:#191970"
    }
  ]
}
)";

WebServerClass    server;
AutoConnect       portal(server);
AutoConnectConfig config;

void setup() {
  config.auth = AC_AUTH_DIGEST;
  config.authScope = AC_AUTHSCOPE_AUX;
  config.username = "user";
  config.password = "password";
  portal.config(config);
  portal.load(FPSTR(PAGE_AUTH));
  portal.begin();
}

void loop() {
  portal.handleClient();
}
If you want to authenticate only specific pages in a Sketch that handles multiple custom Web pages, set AC_AUTHSCOPE_PARTIAL to AutoConnectConfig::authScope. Then, it specifies the authentication scheme with the auth key in the JSON description of the page should be authenticated.
AutoConnect determines which authentication method to use for custom Web pages (such as AutoConnectAux) based on its association with AutoConnectConfig::authScope setting. The table below shows which authentication scheme will be finally adopted. As shown in this table, the final authentication scheme depends on the AutoConnectConfig::authScope setting, and if AC_AUTHSCOPE_PARTIAL is specified it, AutoConnectAux's authentication setting takes precedence over the AutoConnectConfig::auth setting.
| AutoConnectConfig::authScope | Authentication scheme for the custom Web page |
|---|---|
| AC_AUTHSCOPE_PORTAL | Specified by AutoConnectConfig::auth |
| AC_AUTHSCOPE_AUX | Specified by AutoConnectConfig::auth |
| AC_AUTHSCOPE_PARTIAL | Specified by AutoConnectAux::authentication, The default values is AC_AUTH_NONE. |
Authentication designation for AutoConnectAux can also be specified by giving the following value to the auth key by the JSON description:
- "auth" : "basic"
- "auth" : "digest"
- "auth" : "none"
The following example Sketch has two custom Web pages, Hello and Auth. It applies authentication only to the Auth page by setting AC_AUTHSCOPE_PARTIAL to AutoConnectConfig::authScope.
#include <ESP8266WiFi.h>
#include <ESP8266WebServer.h>
#include <AutoConnect.h>

static const char PAGE_HELLO[] PROGMEM = R"(
{
  "uri": "/hello",
  "title": "Hello",
  "menu": true,
  "element": [
    {
      "name": "text",
      "type": "ACText",
      "value": "Hello, word",
      "style": "font-family:Arial;font-size:18px;font-weight:400;color:#191970"
    }
  ]
}
)";

static const char PAGE_AUTH[] PROGMEM = R"(
{
  "uri": "/auth",
  "title": "Auth",
  "menu": true,
  "auth": "digest",
  "element": [
    {
      "name": "text",
      "type": "ACText",
      "value": "AutoConnect has authorized",
      "style": "font-family:Arial;font-size:18px;font-weight:400;color:#191970"
    }
  ]
}
)";

WebServerClass    server;
AutoConnect       portal(server);
AutoConnectConfig config;

void setup() {
  // It's a default value but has no meaning in the AC_AUTHSCOPE_PARTIAL setting.
  // config.auth = AC_AUTH_NONE;
  config.authScope = AC_AUTHSCOPE_PARTIAL;
  config.username = "user";
  config.password = "password";
  portal.config(config);
  portal.load(FPSTR(PAGE_HELLO));
  portal.load(FPSTR(PAGE_AUTH));
  portal.begin();
}

void loop() {
  portal.handleClient();
}
!!! info "PageBuilder v1.4.0 or later needed" PageBuilder v1.4.0 or later is required to use HTTP authentication with AutoConnect. Also, v1.4.2 or later is required to eliminate SPIFFS, which is deprecated as a file system for ESP8266 module.
!!! warning "Can not use ESP32 arduino core 1.0.4 stable release" For ESP32, Arduino core 1.0.4 stable has a bug for HTTP authentication. The upstream of the master is recommended. (or use 1.0.5 later)
Applying HTTP authentication for Built-in OTA
AutoConnectConfig::auth setting also affects the built-in OTA feature. AC_AUTH_BASIC or AC_AUTH_DIGEST setting allows Built-in OTA to authenticate with the UPDATE page. This setting is valid even if AutoConnectConfig::authScope is AC_AUTHSCOPE_PARTIAL. That is if the AutoConnectConfig::auth setting is BASIC or DIGEST, authentication will be required for Built-in OTA.
Authentication with the captive portal state
When accessing the ESP module from an iOS or Android device in the captive portal state, the HTTP authentication framework is disabled in the OS of the client device. Even if the ESP module responds with a 401 unauthorized with WWW-Authenticate, those client device OSs under the captive portal do not display the login dialog and deprive the user of the opportunity to enter their credentials. There will always be an unauthorized error.
AutoConnect's authentication operation based on HTTP (not HTTPS) depends on the OS of the client device, so in the captive portal state, most devices will unconditionally result in an authentication error. Therefore, the default authentication behavior of AutoConnect does not apply authentication in the captive portal state. (It will be ignored even if the AutoConnect setting is not AC_AUTH_NONE)
However, if you want to deny unauthorized access to the protected page even in the captive portal state, you can use the extension bit of AutoConnectConfig::authScope. The AC_AUTHSCOPE_WITHCP flag allows AutoConnect to authentication in the captive portal state. It is set using a logical OR operator for the AutoConnectConfig::authScope setting and AutoConnect will enable authentication at the captive portal if the AC_AUTHSCOPE_WITHCP is ON.
AutoConnectConfig config;
...
config.auth = AC_AUTH_DIGEST;
config.authScope = AC_AUTHSCOPE_AUX | AC_AUTHSCOPE_WITHCP;
...
Assign user sketch's home path
HOME for returning to the user's sketch homepage will display at the bottom of the AutoConnect menu. It could be set using the AutoConnect::home function.

The Sketch HOME path is closely related to the bootUri that specifies the access path on module restart. AutoConnect has the following three parameters concerning control the URIs:
- AUTOCONNECT_URI
The ROOT URI of AutoConnect. It is defined in AutoConnectDefs.h file and is assigned to AutoConnect statistics screen by default. - AutoConnectConfig::homeUri
It is the hyperlink of listed on the AutoConnect menu as HOME. - AutoConnectConfig::bootUri
Which page appears at the captive portal, AUTOCONNECT_URI, or the homeUri. Its page will pop up automatically when you visit the captive portal.
| The definition of HOME | Behavior | Specified by | Default value | Possible value |
|---|---|---|---|---|
| ROOT of AutoConnect | Default for AC_ONBOOTURI_ROOT | #define AUTOCONNECT_URI in AutoConnectDefs.h |
/_ac |
URI string |
| HOME for Application-specific | Listed on the menu list as HOME Also, It may be linked from the menu title and is redundant with the HOME menu item. eg. Case of bootURI = AC_ONBOOTURI_HOME |
AutoConnectConfig::homeURI | / |
URI string |
| Which page loads at the boot time, ROOT or HOME | Appears after module reboot by RESET button with AutoConnect menu | AutoConnectConfig::bootURI | AC_ONBOOTURI_ROOT | AC_ONBOOTURI_HOME |
| Which page appears at the captive portal, ROOT or HOME | Auto pop-up | AutoConnectConfig::bootURI | AC_ONBOOTURI_ROOT | AC_ONBOOTURI_HOME |
Built-in OTA update feature
AutoConnect features a built-in OTA function to update ESP module firmware. You can easily make the Sketch that equips OTA and able to operate with the AutoConnect menu.
AutoConnectConfig::ota specifies to import the built-in OTA update class into the Sketch.
See the Updates with the Web Browser chapter for details.
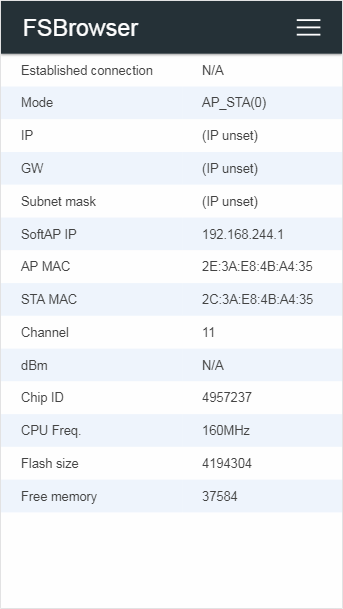
Change menu title
Although the default menu title is AutoConnect, you can change the title by setting AutoConnectConfig::title. To set the menu title properly, you must set before calling AutoConnect::begin.
AutoConnect       Portal;
AutoConnectConfig Config;

void setup() {
  // Set menu title
  Config.title = "FSBrowser";
  Portal.config(Config);
  Portal.begin();
}
Executing the above sketch will rewrite the menu title for the FSBrowser as the below.

Change SSID and Password for SoftAP
An esp8266ap is default SSID name for SoftAP of captive portal and password is 12345678 for ESP8266. Similarly, esp32ap and 12345678 for ESP32. You can change both by setting apid and psk.
AutoConnect portal;
AutoConnectConfig config;

void setup() {
  config.apid = "ap_portal";
  config.psk  = "new_password";
  portal.config(config);
  portal.begin();
}
Also, you can specify the SSID, password for SoftAP with the constructor of the AutoConnectConfig as below.
AutoConnect portal;
AutoConnectConfig config("ap_portal", "new_password");

void setup() {
  portal.config(config);
  portal.begin();
}
You can also assign no password to SoftAP launched as a captive portal. Assigning a null string as String("") to AutoConnectConfig::psk does not require a password when connecting to SoftAP.
But this method is not recommended. The broadcast radio of SSID emitted from SoftAP will leak and reach several tens of meters.
Configuration for SoftAP and captive portal
AutoConnect will activate SoftAP at failed the 1st-WiFi.begin. It SoftAP settings are stored in AutoConnectConfig as the following parameters. The Sketch could be configured SoftAP using these parameters, refer the AutoConnectConfig API for details.
Configure WiFi channel
Appropriately specifying the WiFi channel to use for ESP8266 and ESP32 is essential for a stable connection with the access point. AutoConnect remembers the WiFi channel with a credential of the access point once connected and reuses it.
The default channel when a captive portal starts and AutoConnect itself becomes an access point is the AutoConnectConfig::channel member. If this channel is different from the channel of the access point you will attempt to connect, WiFi.begin may fail. The cause is that the ESP module shares the same channel in AP mode and STA mode. If the connection attempt is not stable, specifying a proper channel using AutoConnectConfig::channel may result in a stable connection.
Move the saving area of EEPROM for the credentials
By default, the credentials saving area is occupied from the beginning of EEPROM area. ESP8266 Arduino core document says that:
The following diagram illustrates flash layout used in Arduino environment:
|--------------|-------|---------------|--|--|--|--|--|
^              ^       ^               ^     ^
Sketch    OTA update   File system   EEPROM  WiFi config (SDK)
and
EEPROM library uses one sector of flash located just after the SPIFFS.
Also, in ESP32 arduino core 1.0.2 earlier, the placement of the EEPROM area of ESP32 is described in the partition table. So in the default state, the credential storage area used by AutoConnect conflicts with data owned by the user sketch. It will be destroyed together saved data in EEPROM by user sketch and AutoConnect each other. But you can move the storage area to avoid this.
The boundaryOffset in AutoConnectConfig specifies the start offset of the credentials storage area. The default value is 0.
!!! info "The boundaryOffset ignored with AutoConnect v1.0.0 later on ESP32 arduino core 1.0.3 later" For ESP32 arduino core 1.0.3 and later, AutoConnect will store credentials to Preferences in the nvs. Since it is defined as the namespace dedicated to AutoConnect and separated from the area used for user sketches. Therefore, the boundaryOffset is ignored with the combination of AutoConnect v1.0.0 or later and the arduino-esp32 1.0.3 or later.
The AutoConnectConfig::boundaryOffset setting allows AutoConnect to write its data to EEPROM while preserving custom configuration data. Similarly, when a Sketch writes its own data to EEPROM, it must preserve the data written by AutoConnect.
The EEPROM library for ESP8266 erases the entire flash sector when it writes to any part of the sector. Therefore, when writing data to EEPROM with a sketch that handles the custom data, it is necessary to call EEPROM.begin using a total amount of a custom data size and the saved credentials size.
The following code shows how to use the AutoConnect::getEEPROMUsedSize function to store custom configuration settings in EEPROM without conflicting with AutoConnect's use of that storage.
AutoConnect       portal;
AutoConnectConfig config;

// Defines the custom data should be stored in EEPROM.
typedef struct {
  char  data1[8];
  char  data2[8];
  char  data3[8];
} EEPROM_CONFIG_t;
EEPROM_CONFIG_t eepromConfig;
...
// Declares to reserve the EEPROM_CONFIG_t area for a Sketch using.
config.boundaryOffset = sizeof(eepromConfig);
portal.config(config);
...
strcpy(eepromComfig.data1, "data1");
strcpy(eepromComfig.data2, "data2");
strcpy(eepromComfig.data3, "data3");

// Use getEEPROMUsedSize to access the EEPROM with the appropriate region size.
EEPROM.begin(portal.getEEPROMUsedSize());
EEPROM.put<EEPROM_CONFIG_t>(0, eepromConfig);
EEPROM.commit();
EEPROM.end();
...
Preserve WIFI_AP mode
Sketch using AutoConnect can open a gateway to the Internet by connecting to a WiFi router even through use Espressif's peculiar WiFi protocol (eg. ESP-MESH or ESP-NOW). These specific communication protocols require to keeps AP + STA as the WiFi mode. That is, to apply these protocols, it needs to launch SoftAP by a sketch itself and then call AutoConnect::begin. But the default behavior of AutoConnect::begin will turn off SoftAP always then it will unable to open a connection.
AutoConnectConfig::preserveAPMode setting maintains WIFI_AP mode without disabling SoftAP inside AutoConnect::begin. The Sketch can utilize the WiFi connection via AutoConnect with ESP-MESH and ESP-NOW protocol by enabling this option.
The following diagram quoted from the ESP-MESH documentation that illustrates the typical topology of the MESH network. The module located at the Root Node bridges between the mesh network and the router by an application that handles two protocols, TCP/IP and ESP-MESH. Its SoftAP communicates with the internal mesh network as an interface of the mesh layer. On the other hand, STA performs station communication with the WiFi router as an interface of the TCP/IP layer. AutoConnect allows assists the connection between the router and the STA of the Root Node using AutoConnectConfig::preserveAPMode and starting the SoftAP via Sketch separately.
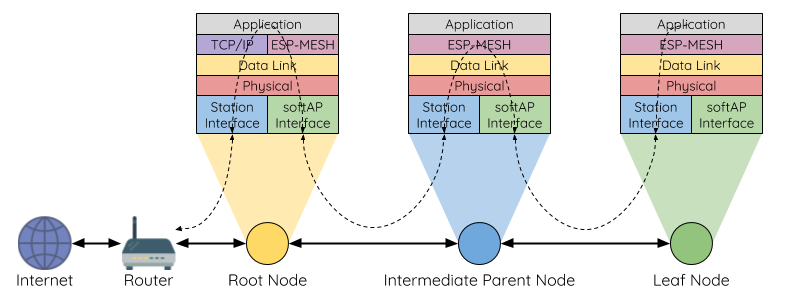
Also in general, the Sketch should set false to AutoConnectConfig::autoRise, true to AutoConnectConfig::immediateStart when applying to those protocols.
Relocate the AutoConnect home path
A home path of AutoConnect is /_ac by default. You can access from the browser with http://IPADDRESS/_ac. You can change the home path by revising AUTOCONNECT_URI macro in AutoConnectDefs.h header file.
#define AUTOCONNECT_URI "/_ac"
Static IP assignment
It is also possible to assign static IP Address to ESP8266/ESP32 in STA mode.4 By default DHCP is enabled and it becomes the IP address assigned by the DHCP server with WiFi.begin.
To assign a static IP to ESP8266/ESP32 with WiFi_MODE_STA, the following parameters are required:
- IP address.
- Gateway address.
- Subnet mask.
- Primary DNS server.
- Secondary DNS server. (optional)
The above parameters must be executed before AutoConnect::begin as arguments of AutoConnectConfig.
AutoConnect        portal;
AutoConnectConfig  Config;
Config.staip = IPAddress(192,168,1,10);
Config.staGateway = IPAddress(192,168,1,1);
Config.staNetmask = IPAddress(255,255,255,0);
Config.dns1 = IPAddress(192,168,1,1);
portal.config(Config);
portal.begin();
Station host name
AutoConnectConfig::hostName assigns the station DHCP hostname which complies with RFC952. It must satisfy the following constraints.
- Up to 24 characters
- Only the alphabet (a-z, A-Z), digits (0-9), minus sign (-)
- No '-' as last character
Ticker for WiFi status
Flicker signal can be output from the ESP8266/ESP32 module according to WiFi connection status. If you connect the LED to the signal output pin, you can know the WiFi connection status during behavior inside AutoConnect::begin through the LED blink.
AutoConnectConfig::ticker option specifies flicker signal output. The following sketch is an example of flashing the active-high LED connected to pin #16 according to WiFi connection during the AutoConnect::begin.
AutoConnect        portal;
AutoConnectConfig  Config;
Config.ticker = true;
config.tickerPort = 16;
Config.tickerOn = HIGH;
portal.config(Config);
portal.begin();
The AutoConnect ticker indicates the WiFi connection status in the following three flicker patterns:
- Short blink: The ESP module stays in AP_STA mode.
- Short-on and long-off: No STA connection state. (i.e. WiFi.status != WL_CONNECTED)
- No blink: WiFi connection with access point established and data link enabled. (i.e. WiFi.status = WL_CONNECTED)
The flicker cycle length is defined by some macros in AutoConnectDefs.h header file.
#define AUTOCONNECT_FLICKER_PERIODAP  1000 // [ms]
#define AUTOCONNECT_FLICKER_PERIODDC  (AUTOCONNECT_FLICKER_PERIODAP << 1) // [ms]
#define AUTOCONNECT_FLICKER_WIDTHAP   96  // (8 bit resolution)
#define AUTOCONNECT_FLICKER_WIDTHDC   16  // (8 bit resolution)
- AUTOCONNECTT_FLICKER_PERIODAP:
Assigns a flicker period when the ESP module stays in AP_STA mode. - AUTOCONNECT_FLICKER_PERIODDC:
Assigns a flicker period when WiFi is disconnected. - AUTOCONNECT_FLICKER_WIDTHAP and AUTOCONNECT_FLICKER_WIDTHDC:
Specify the duty rate for each period [ms] in 8-bit resolution.
AutoConnectConfig::tickerPort specifies a port that outputs the flicker signal. If you are using an LED-equipped ESP module board, you can assign a LED pin to the tick-port for the WiFi connection monitoring without the external LED. The default pin is arduino valiant's LED_BUILTIN. You can refer to the Arduino IDE's variant information to find out which pin actually on the module assign to LED_BUILTIN.5
AutoConnectConfig::tickerOn specifies the active logic level of the flicker signal. This value indicates the active signal level when driving the ticker. For example, if the LED connected to tickPort lights by LOW, the tickerOn is LOW. The logic level of LED_BUILTIN for popular modules are as follows:
| module | Logic level | LED_BUILTIN Pin | Arduino alias |
|---|---|---|---|
| NodeMCU V1.0 | Active-low | 16 | D0 |
| WEMOS D1 mini | Active-low | 2 | D4 |
| SparkFun ESP8266 Thing | Active-high | 5 | |
| Adafruit Feather HUZZAH ESP8266 | Active-low | 0 | |
| NodeMCU 32s | Active-high | 2 | T2 |
| LOLIN32 Pro | Active-low | 5 | SS |
| SparkFun ESP32 Thing | Active-high | 5 | |
| Adafruit Feather HUZZAH32 | Active-high | 13 | A12 |
-
However, the pages registered this way remain legacy. Therefore, the AutoConnect menu bar is not appeared. ↩︎
-
The source code placement of common macros for AutoConnect since v0.9.7 has changed. ↩︎
-
The default user name and password for authentication inherits the setting of AutoConnectConfig::apid and AutoConnectConfig::psk. ↩︎
-
Static IP address assignment is available from version 0.9.3. ↩︎
-
It's defined in the
pins_arduino.hfile, located in the sub-folder named variants wherein Arduino IDE installed folder. ↩︎